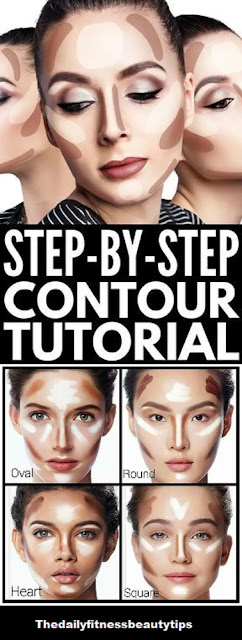
Contouring is a face-sculpting method that involves applying makeup that is slightly darker or lighter than your natural skin tone to sculpt and give dimension to your face. Contouring is all about generating the appearance of shadow and light, as opposed to regular foundation and concealer, which we normally want to match our complexion perfectly.
WHAT YOU'LL NEED:
This does not necessitate the use of a contour kit: Contouring may be done using two tones of concealer or foundation, bronzer, highlighter, eyeshadow, or even brow powder! Simply ensure that all of your makeup products have the same texture (layering powder with liquid or cream products might result in cakey results) and that you have the appropriate makeup brushes on hand.
HOW TO CONTOUR : STEP BY STEP MASTER GUIDE
Contouring should improve your natural face shape and will vary from person to person based on bone structure and facial shape.
STEP 1: Ready Your Face
To avoid makeup from clumping up around any dry skin or hard lines, start with skincare: wash your face and apply moisturizer. Primer is optional, but if you're going for a more complicated makeup look, you may as well. Primer works as a barrier between your skincare and cosmetics, helping them to work together more effectively and last longer. Cover any blemishes or discoloration with a little foundation and/or concealer in hues that match your natural skin tone and undertone.
STEP 2: Apply Shadow
Using your darker color to create a shadow behind your cheekbones is the simplest and most basic approach to contour. Sucking in your cheeks and drawing the product down the hollows of your cheeks, following the natural curve of your jawline and temples, will reveal your cheekbones. You may position your shadow in one of three areas depending on your face shape and unique facial features: along the sides of your nose, in a "3" shape that follows your hairline, under the cheekbone, and jawline, or in an upside-down triangle shape framing your cheeks. Play around with different lines and shadows to mold your face until you discover a style that suits you.
STEP 3: Highlight
Apply your lighter shade or a highlighter to the regions of your face that naturally reflect light, such as the bridge of your nose, the tip of your nose, the tops of your cheekbones, your cupid's bow, and the area around your eyes and brow bone. Use a shimmering (not dazzling!) highlighter, illuminator, or eyeshadow that is somewhat lighter than your skin tone.
STEP 4: Blush
While blush on the apples of your cheeks isn't required for a contoured appearance, it may help your makeup look more natural by acting as a transition between your shadow and highlight regions.
STEP 5: Blend
Blending is especially critical when working with colors that don't match your skin tone. Blend your shadows and highlights into your skin or foundation layer with a wide, fluffy brush, blending brush, or makeup sponge until the lines you made seem more natural.
STEP 6: Set
Apply setting powder or spray for a perfect finish. (ALSO CHECK: How To Apply for Eyelashes Extensions?)

Comments
Post a Comment